InterClub Dinghy Rigging Instructions
By Jesse Falsone
The following tuning guide was written based on the Banks Sails 1995 – 1997 tuning guides, Neil Fowler’s IC tuning guide and my own experience with setting up the InterClub, specifically IC #235. While using the Banks tuning guide myself, I discovered slight differences between how the old and new boats were built. Therefore, where appropriate I have specified alternate specifications to be used on older O’Day built IC’s.
Reference Points on the IC
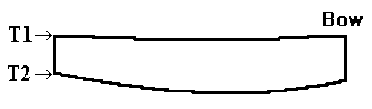
There are two main reference points for the IC dinghy specified in the 1991 Technical Regulations. The first, T2, is at the intersection of the bottom and transom at the centerline of the hull. The second, T1, is exactly 1’6″ above T2 at deck level. If there is a lip extending outward from the deck (the lip that your rub rail is attached to), T1 will be somewhat forward of the lip and in the plane of the transom (see diagram).
Mast Partner Setup
On older boats, specifically O’Day’s, the mast partner came from the manufacturer as an oval hole form-fitted to a Zephyr #1 or Kenyon B mast section. These partner holes have a lip on them to give ample structural area to withstand the compression load from the mast. The preffered partner setup, and the one employed by newer builders including Vanguard, Menkhart and Holby, was to have a rectangular partner hole that allowed the mast to move fore and aft to control pre-bend. Banks recommends the following partner locations measured from T1:
Banks aft opening of mast partners: 8′ 11″
Banks front opening of mast parners: 9′ 2 5/8″
Chocks: Five 1/8″ chocks
The old O’day partners can be modified to allow for adjustment here, but must be done so carefully. You must first grind down the lip, then measure and cut the hole. I recommend that the hole then be either built back up to a reasonable thickness with the addition of extra fiberglass, or use a hard plastic material that extends over the hole and connects onto the partners. I have the latter setup which uses two 1/2″ pieces of hard vinyl that I purchased from Maritime Plastics in Eastport (next to Backyard Boats). This allows 1″ of height for the mast to push against in the partners while under load. This extra area is important with the Zephyr mast, as the walls ar thin and can ding under high loads. Also, the bottom piece of plastic extends aft of the partners to house my compass. Finally, if you’re using the Zephyr, I suggest you take a spare 2 or 3″ section of mast, cut the sail track off with a vertical cut aft of its midpoint, and literally “snap” it onto the mast where it contacts the partners. This will keep the mast from dimpling at that point under heavy load. This is common practice.
My partner setup is slightly different from Banks to allow for my mast reinforcement and a greater range of movement:
IC #235 aft opening of mast partners: 8′ 10 5/8″
IC #235 front opening of mast partners: 9′ 2 5/8″
Chocks : four 5/16″ chocks
My partner width is just wide enough to accommodate the mast with the extra sleeve reinforcement – about 1.9″. A note here – Neil Fowler has suggested that a tight transverse (sideways) fit in the partners is not a major concern, and Jack Slatery won multiple championships with a large gap here. I like a tight fit just the same.
Note that the class rules specify that the aft partner opening can be no less than 8′ 10 1/2″ from point T1, and no longer than 4″!
Mast Step Setup
The mast step position is very important as it is the major determinant of mast rake. The proper mast rake is essential to good boat speed and pointing. Different builders have used different step heights. That is to say that the main longitudinal box girder that the step actually bolts to may be a different height, thus affecting fore and aft step placement. For newer boats with the higher girder (@ 5 – 5.5″ measured from floor), Banks recommends the step be placed at 9′ 2 5/8″ from pont T1 measured on a diagonal and with the mast on the step. My girder is only 2.25″ high and I use a 1/2″ thick vinyl piece for the step to rest on (so 2.75″ total height). Therefore, I get a roughly equivalent mast rake using a measurement of 9′ 3″ from point T1. Banks recommends a mast rake of 18′ 8 1/2″ measured from the halyard shackle to point T1, and with the halyard hoisted and in its lock (see Spar Setup section). This measurement is with the mast resting all the way aft in the partner and with the forestay completely slack. Note that this distance will also vary slightly with shroud tension too. You also may want to consider an adjustable step like Neil Fowler uses. He has modified a Europe dinghy step to fit his Zephyr mast. This will require some welding. RWO also manufactures a step (Optifit mast step adjuster) which may work with some modifications.
Chainplate Location
The chainplates are best located as far forward as the rules allow so that the sail can be eased as far out as possible while sailing downwind. The current IC technical regulations specify that the chainplates must be at least 1.5″ aft of a taut string running through the bearing points of the shrouds. Under this interpretation, the maximum distance measured from T1 is about 8′ 11 1/2″ (diagonal measurement across the deck) and not 8’11” as the IC Measurement Sheet suggests. It should be noted that the possibility of inverting and breaking the mast exists with the Zephyr section and the most forward chainplate position.
Spar Setup
Interclub spar setup is not particularly difficult, but takes time and preparation to do it right. The best general advice I can give is to take your time so nothing gets overlooked and no extra holes end up in your spars.
Mast Setup
I begin with a standard 20 foot section, either a Zephyr or a Kenyon. Apparently, the Kenyon section is not distributed by that manufacturer anymore, but a similar same section can be purchased from Dwyer. It should be noted that the Dwyer section is not named specifically by the Interclub class rules (Oct. 1991), but since Dwyer manufactured this section for Kenyon originally, I believe that the Dwyer section should and will be formally legalized when the class rules are revised this year. Some people use the Dwyer and nobody complains.
The difference between the two sections is that the Kenyon/Dwyer are slightly heavier and stiffer (0.824 lb/ft). This is perhaps better for stronger winds and greater durability. Also, this mast will bend less than the Zephyr with equal shroud and forestay tension, so your sail may not get quite as flat – a flat sail being beneficial in light/moderate air and flat water.
The 20 foot section allows about 6 inches of extra section left that I like to use as a reinforcement that you can actually snap on to the mast and boom in such critical load areas as the mast partners and the vang bail. I also think its worth the $18 to get the mast feed milled in by the manufacturer. The feed should be milled 3.5″ long beginning 14′ 11.75″ from one end (this end is obviously now the top of your mast). Zephyr has this data.
I like to work from the top down on the mast, and I don’t make a final cut until the mast is completely put together, and accurate height measurements can be made. Begin by installing the mast head fitting which should have the sheaves included with it. One sheet metal screw on each side will be enough to secure this fitting. ALWAYS USE STAINLESS STEEL HARDWARE! All measurements for the mast will be taken from the centerline of the sheaves (now designated SCL). Do not take measurements from the top edge of the mast! See the technical rules for measurement specifics.
* A note about screwing in sheet metal screws: I use the largest screws which will fit into the hardware holes. I drill the mast out with a bit that allows the screw to self tap in using sufficient force, but not enough to break the screws. Use lubricating oil and experiment before doing something you’ll regret. Go with small drill bits and work up until the screw taps in right.
The next step is to install a halyard lock, if desired. I like to use one because it allows me to use a very thin and light spectra halyard below the wire (halyard is wire at top), and the halyard won’t slip once locked. I placed my lock 4″ (class minimum distance) below SCL. However, this distance is not critical, and its best to first have the wire part of your halyard made up. You should use 1/8″ wire for this at a length of at least 10 1/2″ from halyard shackle pin to top of swage where a 1″ loop is made for the spectra line to tie onto. The swage fitting acts as the stop, fitting into the halyard lock. I have a twist-lock shackle connected to one end using an end stop fitting swaged on. Make sure the shackle is long and wide enough to fit over your headboard (@ 1″ long). Once the sail is in position with the wire running through the sheaves and the swage in the lock, mark one of the screw holes of the lock on the leading edge of the mast. Its best to have someone assist you by holding the head of the sail in position against the tension you put on it as you mark the lock position. I also use an elastic shock cord with a hook affixed somewhere down low on the mast, partners, or bottom of boat. Instead of cleating the halyard, I just make a permanent loop in it that goes into the hook and keeps the rope part of the halyard taught. No cleat is needed in the mast using this method.
Now you can install the forestay and shroud tangs. Its best to have the shrouds and forestay as close together as the rules allow. The top hole of the forestay tang should be 39″ below SCL and the top hole of the shroud tangs should be 53″ below SCL.
Before you can fit your mast into the boat, the mast step must be installed close to its fixed position on the centerline longitudinal. My IC was built by O’Day (# 235), and it originally had a brass step fitted with a threaded peg and donut fitted into a rectangular hole. The mast rested on the donut and the shrouds were tensioned by screwing up on the donut to raise the mast. I discarded this system, and installed the stock Zephyr mast step on a high density industrial vinyl stock from Marine Plastics in Eastport (6″ long x 3″ wide x 1/2″ thick). The step was mounted onto the plastic with through bolts and the plastic was screwed into the longitudinal, covering the hole for the old step. It may be beneficial to delay fixing the step permanently until you have assured yourself that the mast rake is correct (about 18’8.5″). See the tuning guide for further assistance here.
With the mast on the ground place a mark at 16 feet (black band position) and a mark at 17’9″ (where your mast should meet the top of the partners). Use 3/4″ electrical tape as a black band with the top edge at the 16′ mark. With the step in place (temporary or fixed), put the mast in the boat. Now measure from the top of the partners to the 17’9″ mark with a ruler. This is the amount you must cut from the bottom of the section to get the correct mast height. Double check and re-think this – you only get one chance to do it right!
Prepare to cut the mast. Recheck all measurements for sanity. If you are hacksawing the mast, leave a little extra space for filing.
All running rigging should be 3/32″ wire. However, I am now experimenting with a 1/8″ Vectran forestay. Vectran is ideal for this and will save some weight aloft. Besides being light, it doesn’t absorb water, can bend around blocks without fatigue, it is extremely strong and can operate at loads up to 50% of its breaking strength without creep. A 1/8″ Vectran line has a breaking strength of 2000 lb compared with 1400 for 1/8″ wire! Try Vectran in you’re vang also, but always use thimbles to avoid point loading.
My shrouds and forestay have the following dimensions measured from the hole of each end fitting:
Shroud Length: 13′ 1″
Forestay Length: Variable – I use a 13’6″ section of Vectran (with thimbles) which mates via a shackle to a short length of vectran that runs to the forestay purchase. I have covered the short piece of vectran to guard against chafe.
This will put the shroud at approximately the middle of the adjustment range of a 4″ shroud adjuster. This also assumes a chainplate location 8’11.5″ from T1 (see tuning guide). Length will be shorter if using Sta-Master adjusters.
I’ve found the best all-round (and least expensive) shroud adjusters for the IC are ones that have 1/8″ increments, with two columns of holes. However, some people like to experiment with different tensions using calibrated adjusters. Annapolis Performance Sailing has a good selection. Race-Lite makes a good (and cheap) shroud adjuster.
The last thing to connect to the mast is a vang bail a few inches above the base. Use a through bolt and a lock nut.
Boom Setup
My boom is made from a 9 foot section of my old mast. This seems to be a common practice since masts get damaged occasionally, but can be recycled in this manner. Also, booms can tolerate a slight sidebend where sidebend on masts destorts sail shape.
Begin by installing the gooseneck. The most common goosenecks are the ones supplied by the spar manufacturer for the particular section. The Zephyr has a slug which slides into the sail feed and goes down the mast track to rest on a fixed slug screwed into the mast at the right height (boom level with top of black band). I use an adjustable slug which I can remove so there are less holes in my mast. The gooseneck should fit snug in the boom and be screwed in with stainless steel sheetmetal screws (I use 4).
Now mark the boom black band by sliding the gooseneck on the mast and measuring 8’8″. The forward edge of the band should be at the mark. You should have approximately 7 inches of section left aft of the band for the outhaul turning block and the aft mainsheet block.
The outhaul is the next, and most difficult installation. I use a simple internal 2:1 outhaul that exits the bottom of the boom up where the crew sits. I mounted a turning block as far aft on the boom as possible. This requires you to cut a hole in the boom and do some filing to fit the block. If you are using an old mast to make the boom, a good thing to do is use the milled portion as the back end of your boom. This makes installing the block much easier. Also, having limited tools, I used a large drill bit to drill adjacent holes for the outhaul block cut-out. Make sure you leave enough metal aft to put a small bolt and nut on. Use thin wire or spectra for the part of the outhaul that runs through the block. The wire/line should connect to a slide in the boom. This slide should have a shackle on it to connect to the clew. Make sure the slide is the right size for the groove or else it may jam. The other end of the wire/line connects to a floating block inside the boom (Harken 16mm block). On my boom, I have dead ended the outhaul adjustment line through a hole in the boom (need measurement), and run the other end through the floating block and to another exit hole forward. This exit hole it a few inches long and is wide enough that the line slides through easily. Then, about 6″ forward of the hole I mounted a block on an eye strap so that the line could be adjusted by pulling from almost any angle. A jam cleat between the hole and the block completes the system. Something else I have done is to run a piece of shock cord from the outhaul slide forward and secured to the front of the boom. This allows the outhaul to ease itself more easily when there is little pressure on the sail.
The next step is to mount the eyestraps for the mainsheet blocks. One goes near the aft end directly above the traveler or bridal. I have used small nuts and bolts here to fasten the eyestrap since its easy to reach them with a wrench. The other block is mounted directly above your mainsheet block mounted on the centerboard trunk. Also, most people mount a 3-4″ wide piece of webbing around the boom and at the mainsheet level to keep the mainsheet from sagging between the blocks. I just used small sheet metal screws with a big washer to keep the webbing from tearing through.
The last step is the vang bail which should be about 25-26″ from the front edge of the boom. Consider using a 3-4″ section to “snap” onto place to beef up this area (like in the mast partners). Most booms break where the bail is mounted. Just saw off the groove and pop on.
Many people trick their boom out by sawing lightening holes on the aft sides. Steve Benjamin uses 4-5″ holes about 1″ apart and the holes are covered with a nylon fabric. I used a 1″ bole saw on a drill to make 9 holes at 1″ spaces down both sides of my boom. Don’t put holes too close to the vang or mainsheet blocks!
Hardware
I have tended toward Ronstan for most of my hardware on the IC, with some Harken, RWO, Holt-Allen and Race-Lite also. You would be surprised at how much hardware you need for such a little boat, so shop around for the best price. At my last count, I use about 20 micro blocks and 7 cleats in my set-up. Check out Ronstan’s 19 mm blocks and Harkens 16 mm blocks both which offer high working loads and light weight. Holt-Allen makes some cool all-stainless blocks which are very small but have an incredible working load. I use one of these in my vang.
Centerboard Pin Location
The centerboard pin location is another important speed and pointing determinant. Generally, you want the pin location to be as far forward in the trunk as possible or as far as the rules will allow. However, centerboard pin holes vary, so you should first check to see that when the CB is retracted and angled forward, the distance measured along the hull from point T2 to the back of the board is 67.75″ and 79″ to the front of the board. The maximum allowable pin centerline location is 77″ forward of point T2 or about 79″ measured diagonally from point T1. A major difference between old and new fiberglass IC’s is the leading edge of the centerboard trunk. Older boats have a vertical trunk leading edge which does not permit the CB pin to be placed as far forward as desired. The newer boats were built with a trunk with a leading edge that slants forward allowing the centerboard to be further forward in the trunk when it is raised. I was able to move my pin location about 1″ forward to 76.25″ from point T2 on IC #235 to get the correct CB location while still being able to retract the centerboard completely. Of course you can leave you’re pin hole where it is and try moving the hole in you’re CB aft instead, but this may be a tough job.
You may also want to fair the front of the CB slot into the leading edge of centerboard using some epoxy and microbaloons such that when the centerboard is fully down to the correct rake angle, the leading edge is perfectly mated into the slot. See the section on the Elements of Fast InterClub Foils for more detail.
