By Jesse Falsone
The following pictures and text illustrate various aspects of rigging my new Guck-built IC, #802. I bought the hull from Guck and rigged it myself. Along the way I learned what worked and what didn’t. The pictures and descriptions will give examples of the critical areas to keep in mind when rigging a new or used IC.
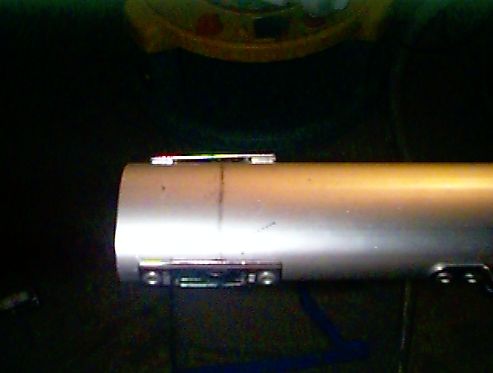
 This picture details the end of my boom. The boom was made from an old mast that came with my first boat, IC #235. I’ll probably replace the boom next year since this one is about 35 years old and the metal is getting soft. My outhaul system is visible here. The yellow outhaul line (internal) dead ends with an eight-knot on the bottom of the boom, runs back through the Harken 16 mm block and forward to a Harken 368 16 mm in-line exit block (see Outhaul.tif). The clew shackle is directly connected to a slug slide inside the boom track. A shock cord running all the way to the front of the boom keeps a constant tension on the slug so that the outhaul will ease off in light air. I used 1/8″ Vectrus spliced directly on the aft end of the slug. It then runs through a Harken #242 Micro through-deck block (aft end of boom) and forward to a shackle connecting it to the 16 mm block (internal). The lightening holes were drilled with a 1″ hole saw (spaced about 1″ apart) and I have 10 on each side. This is a quick and dirty way to do it, although I have seen nicer lightening holes in other booms. The aft end of the boom is also shaved off for reduced weight. A light boom is nice in light air since it reduces leach tension. The eyestrap on the end of the boom is through-bolted with washers and lock nuts. The front of the black band is exactly 8’8″ from the back of the mast (see tech regs). See Outhaul.tif and Goosneck.tif for additional outhaul details.
 Here’s a shot of Alex Pline’s new mast. He is using velcro to hold the haylard end tight. The haylard is locked at the mast head, making for easy access for the crashboat operator to release when the boat is over in the event of a capsize. The end is held firm by making a loop in the haylard just above deck level, inserting a piece of sticky-backed velcro (hooks) and doubling it back on itself and attaching the hoops velcro to the mast. When attached, the velcro holds the haylard tight against the mast all coiled nicely ready to run. All the crashboat operator has to do is give a tug on it, and it all comes undone.
 This picture details the bow of IC 802. With the bow cover removed, you can see the forestay adjustment system. The system incorporates a 6:1 purchase with a 3:1 (as seen) cascading to a 2:1 above the deck (see Forestay.tif). I designed this system to require no holes in the bow tank. The tanks are foam cored and I thought that fittings there would damage the tanks if stepped on repeatedly. Also, I wanted the cam cleat on the partners where it’s accessible. The forestay is 1/8″ Vecrtus and dead-ends at a pin on the bow. I use a 4″ Ronstan Channel Shroud Plate (R2350) on the bow to secure the forestay turning block. The block on the bow is a Harken 300 wire block. The other end loops up through a Harken 098 HL wire block (see Forestay.tif) and back down through the Harken 300 wire block. The Vectrus end visible in the picture is spliced around a thimble and connects to a single Ronstan 19mm becket block. The black control line runs through a single Ronstan 19mm block attached to the front of the partner and through a hole in the front of the partner (via an RWO bushing) that leads up to the Holt-Allen through-deck cam cleat mount. I also have a Harken 243 upright lead mounted on the underside of the partners to make a fair lead to the through-deck cam cleat mount.
The bow cover is very nice – made by Phil Kinder in Bristol, RI. A shock cord around the perimeter keeps the cover on tight.
The forestay system works perfectly. It may be a good idea to put a cover on the Vectrus where it goes through the deck bushing on the bow. The 6:1 purchase is nice since it gives ample resolution for making fine adjustments and takes some load off the cleat so it won’t slip.
 Here’s the stock Vanguard/Guck CB handle assembly. I used a generous amount of anti-corrosion compound on the bolts since these can disintegrate with time. The rubber gasket is greased with marine lube, but will need to be replaced next season. I also use some 3M marine silicon in the pin hole to help seal it. Guck did a nice job of installing this piece. The marks on the CB cap are for the CB position. The forward mark is the vertical position and the aft mark is the 4.5″ tip forward position. The CB cap was built with an extra layer of glass to add some weight to the hull in a useful area. Note my padded hiking straps!
 Here’s a picture of my mast chocks. I use five ¼” plastic chocks. I got the plastic from Maritime Plastics in Eastport. The white chock (aft) is ground down a little to fit tight. The black chocks (fwd) are rarely moved, although I probably should experiment more with these. I use shock cord to secure the chocks so they don’t fall out in a capsize. Also note the snapped on mast section at the partners. This serves to strengthen the mast in compression loading against the partners, and also shims the mast athwartships. The yellow line is a standard polypro bow line that the Annapolis Fleet requires. The red line is my cunningham (4:1) and the black bracket is for my Silva compass.
 This is a picture of the starboard side control line turning blocks mounted at the base of the CB trunk. The red line is the cunningham and the blue line is the vang (8:1). The screws are tapped directly into the wood with a thickened mixture of epoxy on the threads. I have used #417 16mm Harken blocks (these have a swivel) mounted on small Harken eyestraps. Note that the eyestraps are offset and that the vang runs up the aft side of the bulkhead. I had to carefully position the blocks so that the lead was fair going to the cheek block and the line didn’t rub against the bulkhead.
 Here you can see the aft starboard control line cheek block (Harken #416 16mm). These cheeks give the control lines a fair lead to the control line cam cleats (see Cntrlclt.tif). I had to play with it a little, but the control lines run freely and are out of the way. There is an opposing cheek block on the other side of the bulkhead. I used the plastic extensively to back almost all hardware on the boat. Any holes are either sealed with epoxy or silicon. My thwart is cored with plywood where the cleats are, so it’s important to seal them well.
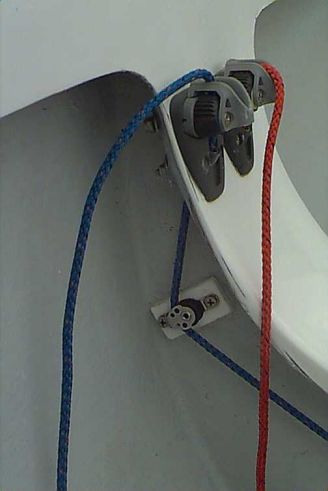
 All 4 cunningham and vang control line cleats are Ronstan RF 5000 Carbon Cams mounted on a Holt-Allen cam cleat through-deck fitting. I used a Dremel tool to grind out the area on the thwart and used plenty of thickened West System to mount the fittings. Each cleat is mounted on either side of the bulkhead, although 2 of the screws go through the bulkhead. This was the trickiest part of outfitting the boat. I really like the placement of these cleats because they’re easy to reach when hiking. Be careful to buy the right size screws. They have to be pretty long to go through the thick thwart. Also, use 4 or 5 mm pre-stretch line here.
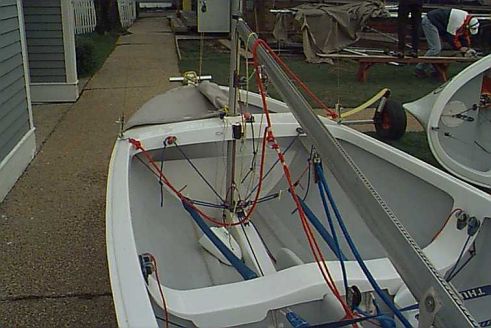 This picture shows an overall view of the cockpit from the thwart forward. Looks a little complicated for an IC! I should have removed some extraneous lines from the picture. The red line hanging over the boom is the lifting bridal. Also note that I had Guck install my bow tank inspection port on the back of the tank rather than on top of it. I wanted the top of the tank totally clear! The only down side to placing the port there is it’s harder to reach into the mast step and back bolts with nuts.
At the bottom of the picture, you can see where the control line cleats are desined to go at the back of the thwart. Placement here is easy, but it’s a pain to reach into the boat while you’re trying to hike.
 This picture isn’t so good. It’s a picture looking inside my stern tank through the inspection port. The drain is another little extra I had Guck install. It runs from an extra plug in the cockpit to another plug on the transom. When I’m finished sailing, I tip the boat up and hose it down. The water runs out through the back of the boat. I really like this option and heavily recommend it. There’s an extra plug that goes directly to the tank also.
 Here’s a close-up of my forestay at the 2:1 block (Harken 098) above the deck. Note the nice Vectrus splices! I did all these with a coat hanger, but I recommend getting a 1/8″ fid if you can find one. The splices are real easy and they look great when done properly. By the way, 1/8″ Vectrus has a 2000 pound breaking load and exibits almost no creep below 1000 pounds. Plus, it’s cheaper than wire! The blue line are whipping needed to secure the splice.
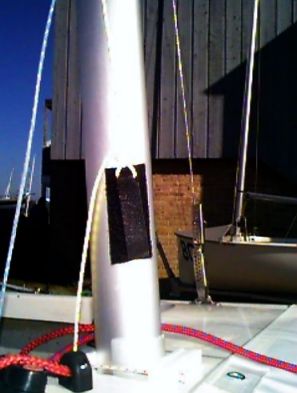
 Here’s an intersting picture. The gooseneck is the standard Zephyr ($90). I use two sail track slug stops – one on top and one below the gooseneck. The one below keeps the boom from dropping. I prefer this to drilling more holes in the mast. The one above keeps the boom from rising under cunninham load. My cunningham is 4:1 cascade purchase. The first 2:1 is under the partners (see Maststep.tif). It then runs up to another 2:1 above the partners and is dead ended on the gooseneck (see the red knot in this photo). Also note the yellow outhaul line going through a 16mm block and then down to the Holt-Allen 180 degree swivel cleat. The swivel is mounted by tapping into a small brass nipple. Brass wasn’t my frist choice of metals, so I may put a piece of zink on it to prevent corrosion. The white plastic hook at the forward end of the boom track acts as a stopper for the outhaul shock cord described in Boomend.tif. Also note that the top of the boom is mounted at the top of the black band.
My halyard is cleated to the mast in this picture. I use a wire/rope halyard. The wire has a ball pressed onto it which fits nicely into the halyard lock. The line is 2mm spaectra cored (Marlow Excel).
 Here’s another nice Guck touch – standard gussets on the partners. They even placed them further forward and you hardly even notice them. I noticed a dramatic difference in stiffness when I put gussets on my old boat, IC #235. These are glass taped, but all new Gucks will have the deck and parts bonded with Plexus.
 Here’s a shot of my new Guck IC. I still have to put the entire number on the bow before the Nationals! Guck started numbering boats at 800, so a few numbers were skipped when Vanguard ended IC production. Vanguard skipped about 15 numbers when they began building boats. I made the trailer custom on a ship a buddy of mine works on. Lucky for me he’s an expert TIG welder! We used 6063 Aluminum and this thing is strong enough to hold a tank.
 Here’s a shot of my mainsheet block. I used a Harken Ratchamatic #363. It was a little pricey, but it runs freely when the wind is light. What a great invention! The mainsheet is 9 or 10 mm Marlow Marstron – nice on the hands and doesn’t absorb water. No core, so it’s light also. The red shock cord holds the skipper’s hiking straps inboard. The hiking straps are secured to an eyestrap on the underside of the thwart. This is the best place since the eyestraps are loaded in shear. I originally put eyestraps on the bulkhead, but it was clear that this was not strong enough.
 Here’s a poor picture of the top of my mast. Note the halyard lock placed 4″ below the mast sheaves. I learned never to hoist the halyard with the wind behind you or the halyard will jump the sheave and fray the wire part. Also note that my forestay and shroud seperation are minimized by the class rules – I think 13″ apart. The forestay is at it’s lowest setting and the shrouds at their highest.
 Another detailed picture. The mast step is one of the most difficult areas of the boat to rig. I made some mistakes here. The actual stainless step is worth the money – $40 from Guck. I should have mounted mine about 1″ further forward. My mast is stepped at 9’3″ from T1 in this picture. I use a quick pin that goes straight through the mast to secure it. I opted for this method to keep the mast from turning. You can see the first 2:1 portion of my cunningham (red line going through the Ronstan 19 mm floating block). Check out my totally hot adjustable hiking strap system! I got a lot of shit for these, but they work great. The 2:1 purchase reduces the load on the cam cleats mounted up on the partners and makes it easy to pull when your hiking. The adjustment is nice for those longer legs at the nationals and also when you have different size crews sail with you. Make sure you use a fuzzy covered line here since it won’t slip as easily. The red shock cord with the hook used to be for my halyard, but I just cleat it now after it’s in the lock. To the left you can see my vang purchase. I use an 8:1 that employs a 4:1 cascading to a 2:1. All the line on the 2:1 is Vectrus.
Notes on my mistakes here – Don’t mount anything (i.e.eyestraps) on the sides of the glass step that pulls outward. Blocks loaded in shear like the cunningham cheeks are OK. Mount your hiking straps to the SS mast step like I have it for strength and durability. When mounting the mast step, make sure you have the right drill and tap combination! I broke a tap in the aluminum piece which is glassed into the step.
Always use an anti-corrosion additive when mating SS screws to aluminum.
 Here’s my outhaul exit block (Harken #368 16 mm in-line exit block). The only thing I don’t like about my outhaul system is that the slug has a lot of friction. I even tried McLubing it! You can also see the top of my vang shackled to the boom bail. When I build a new boom, I won’t use a bail like this again since you have to drill a hole in the boom. When IC booms break, they always break at the hole! I’ll use some webbing looped over the boom instead of the bail.
Notes – some people use a stainless hook through the boom bail. These work well, but the hook must be big enough not to bend. I think the shacke is best for strength and weight.
 I use Race-Lite shroud adjusters (APS has them). Ronstan makes a similar one. It has 1/8″ hole spacing and I use quick pins to make adjusting and de-rigging faster. The thin yellow line is a safety for the pins – don’t want to lose these! Also check out the lifting shackles on the chainplates. Forward of the chainplate and attached to the hull is a bushing with a bolt through it for the bow cover shock cord to loop around.
 Ah, a picture of my deluxe adjustable hiking straps! I found a great article on how to make these in an issue of the Thistle Class Assoc. “Bagpipe” magazine. I used 2″ tublular webbing and padding (closed cell foam) from a cheap camping mattress. Both items are available at your local camping store. Also note the red shock cord which pulls the hiking strap up to make it easy to get your feet in. I dead-ended the chock cord to one of the through-bolts on the chainplates. I used some Holt-Allen cam cleats (got on sale) for the hiking straps. You can also see the vang system more clearly here. I used a 16 mm Holt-Allan (HA4568) high-load block to connect the 2:1 and 4:1 cascades.
 Here’s my transom. I would prefer that the transom hole be a little larger by extending the cut-out down 1″. This would give more room to mount the rudder and it wouldn’t hit the top of the cut-out or the gunwhale on the inside of the transom. It would look nicer if the corners were rounded too. I used Seasure pintles and gudgeons. They’re expensive, but are the best. I mounted both gudgeons below the tiller since my rudder head is cut short. If I get a new Waterat rudder, I’ll mount the top one above the cut-out. Guck kept the lip on the transom for additional strength. Vanguard chopped this off. I’ve seen more than one older boat (some O’Day’s and Menkarts) with deck delamination at the transom from mainsheet tension. The plug in the transom is for the cockpit drain.
 This picture details the masthead on my new mast. Notice that the standard masthead fitting has been omitted and 2 Harken sheaves (#242 thru deck) are used instead. I first saw this on Geoff Moore’s boat and I thought it was slick. There is a small weight savings with this setup but it costs slightly more. It also takes a little time to file out the holes to install the sheaves. Its best to use a Dremel tool for this purpose. I used stainless rivets to mount all the hardware on this rig. The pencil mark is the centerline of the sheaves. I will probably put a piece of foam inside the mast at the top to keep rain water out. The mast lock is at the right.
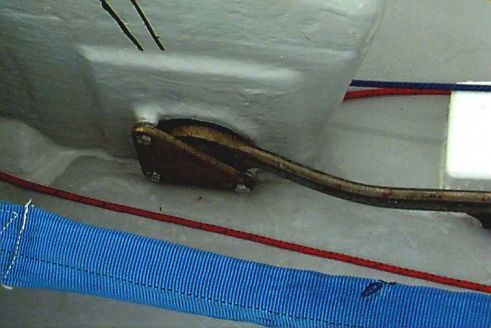
 This is my traveler set-up. The track is just your basic 5/8″ Ronstan stainless steel track available in 5’ lengths. The slide is a Ronstan RF 370. The padeye is a Schaefer SC7803. Again, I didn’t want to mount anything unnecessarily to the stern tank. Therefore, I mounted my cam cleat to the transom. The cleat has an angled riser on it so it would stay cleated when I pulled on it from behind the block. The block is a Ronstan 19mm spring stand-up.
